1. IMPORTANT INFORMATION
1.1. Target group
This guide is written for Abas partners and IT system administrators who newly install Abas or perform an upgrade. IT system administrator knowledge is required for the installation guide.
1.2. Guide
-
This guide describes the entire installation or upgrade process in great detail. What you specifically need to do is marked as "ToDo"!
-
This guide is based on a minimal installation of the operating system RedHat 9 or Debian 12.
1.3. Directory structure
In this guide, we use the following directory structure:
-
/mnt1/ (mount point)
-
/mnt1/tools/(to save the files)
-
/mnt1/abas/ (ERP installation directory)
If your existing installation has a different directory structure, note when reading the guide that the directory names must be replaced by your own in all commands.
1.4. Security information
1.4.1. Customization of the Abas login (user name + password)
In Abas it is possible to log in using only a password and not, as usual, with the combination of user name (or ID) and password. This approach has disadvantages in terms of security and cross-system authentication.
Therefore, be sure to use the system login or SSO login.
In password definitions (see Online Help) you can specify which login you can use to log in.
1.4.2. Customization of the standard passwords from the standard release
You should definitely adapt the standard password of the following password definitions with an Abas login:
-
Maintenance
-
Password: adm
-
Password: euser
-
Password: eauser
-
Password: sy
-
Password: <return> (empty)
1.4.3. SSL encryption of connections
In the Online Help you will find the following important instructions on how to encrypt specific connections:
-
"Encryption of communication between the GUI and the application server"
-
"Configuration of email distribution"
1.4.4. Use of certificates
Self-signed certificates are not recommended for security reasons and are therefore not supported.
2. INSTALLATION REQUIREMENTS
This section must be reviewed by the IT system administrator and any missing prerequisites fulfilled. Root permissions are required.
2.1. Operating system
-
The operating system approved for the new Abas version is installed (Abas versions - Supported operating systems can be found on the extranet).
-
We recommend updating the operating system shortly before the Abas upgrade (yum update)
-
Ensure that there is enough hard disk space available. Client databases can temporarily get five times as large during the upgrade as is shown by the "starte_gc.sh -p <client dir>" command.
2.2. Internet access
-
Internet access must be possible, as the erpOSPrepare.sh script retrieves and updates the package lists there.
-
Docker container images must be downloadable from our Artifactory.
-
If you have any problems, a guide is provided in the "Troubleshooting" chapter under Problems with internet access.
2.3. Java is installed
-
You must specify the Java path when calling the erpOSPrepare.sh script. The erpOSPrepare.sh script checks if Java has been installed. The script does not run without Java.
-
We recommend using the OpenJDK on the Abas server.
-
If Java has not been installed yet, you can follow the guide under Install Java (as the user root).
-
A JDK must be installed. A JRE is not sufficient (otherwise the AJO interface cannot be generated).
-
Java version 17 must be installed. Other Java versions are not supported.
2.4. Docker and Docker Compose standalone are installed
IMPORTANT INFORMATION:
-
You must install Docker and Docker Compose standalone from Abas Version 2024.Q3 for Abas components, Multisite (RabbitMQ), Abas Service Planner, and Abas PM to work.
-
Docker CE (Community Edition) and Docker Compose standalone must be installed before calling the erpOSPrepare.sh script, as the script adds the required users to the Docker group.
-
Note on RedHat:
-
The packages for Docker provided by RHEL cannot be installed.
-
You can identify an incorrect Docker by the following in /etc/group:
dockerroot:992 -
For correct installations, the name is docker in /etc/group.** The Abas installation routine checks this name during the installation.
-
-
If Docker was installed incorrectly, it must be reinstalled!
-
There can only ever be one Docker installation on the server. If you reinstall Docker, you must remove the previous Docker installation first.
-
The standalone version of docker-compose must be installed (see Installation Docker Compose standalone)
-
Docker must be on the data partition.
(Instructions for the change can be found under Change the Docker root directory).
In the appendix you will find the instructions Installation Docker CE (Community Edition) and Installation Docker Compose standalone as well as all other necessary steps if you have not yet installed them.
2.5. Skip the download of current components
The installation archives of the Abas version to be newly installed also includes the following components, among others:
-
GUI
-
RabbitMQ
At the time of delivery, these components are up to date. However, at the time of installation/upgrade there may already be newer versions of these components available on the Abas Artifactory.
Therefore, an attempt is made during the installation/upgrade to get a current version from the Artifactory so that the latest version of these artifacts can be installed.
If you want to skip the additional download of these components, this is possible using the following shell variables:
SKIP_LOAD_ARTIFACTS=1 |
No component is updated automatically (automatically includes all following configuration switches). |
DO_NOT_LOAD_GUI=1 |
The current artifacts of the GUI are not downloaded. |
DO_NOT_INSTALL_RABBITMQ=1 |
The current artifacts of RabbitMQ are not downloaded. |
DO_NOT_LOAD_GUI=1 ... install-unix.sh +
DO_NOT_LOAD_GUI=1 ... upgrade-unix.sh ... +
3. DOWNLOAD AND EXTRACT THE ERP INSTALLATION FILES
This chapter will show you which files you must download, where they are copied to and how they are extracted.
3.1. ToDo: Retrieve files from the Abas download server (Artifactory)
Since July 2019 the installation files can be found on the Artifactory server (registry.abas.sh). It can be accessed using the same login data as for the Abas extranet. On the extranet, you can find a detailed description on the Download of Abas distributions. If problems occur upon login to the Artifactory server, you have probably not yet clicked the Transfer access data button on the extranet.
You must download the following installation files (XX represents any number):
-
erp-basepack_2200r8nXX.tgz
-
erp-x86_64_linux_2200r8nXX.tgz
|
NOTE: |
-
Always use the most up-to-date amendment for upgrades in order to be able to make use of the most recent error corrections.
-
If you would like to use an older amendment, please read the bugs fixed for your preferred version beforehand.
3.2. ToDo: Copy files to the installation server (as the user root)
# Installationsverzeichnis erstellen und Rechte anpassen
mkdir -p /mnt1/tools/abas
chmod 777 /mnt1/tools/abas
Copy the installation files from the Artifactory server to the /mnt1/tools/abas directory.
Information on the direct download of the files using the wget command can be found on the extranet under Download of Abas distributions.
Note that wget must be installed. If wget does not work, you can find information under Problems with internet access
cd /mnt1/tools/abas
# Bei user= Ihre Mail-Adresse vom Extranet eintragen !!!
# Passwort wird nach Aufruf abgefragt; Ihr Extranet-Passwort eingeben
# Versionsnummer anpassen !!!

wget --user=Ihre.ExtranetEmail@IhreDomain.com --ask-password https://registry.abas.sh:443/artifactory/abas.downloads/versions/2200r8n01/erp-basepack-2200r8n01.tgzwget --user=Ihre.ExtranetEmail@IhreDomain.com --ask-password
https://registry.abas.sh:443/artifactory/abas.downloads/versions/2200r8n01/erp-x86_64_linux-2200r8n01.tgzcd /mnt1/tools/abas
# Entpacken der Installationsdateien im Verzeichnis /mnt1/tools/abas
tar -xzf erp-basepack-2200r8n01.tgz
tar -xzf erp-x86_64_linux-2200r8n01.tgz4. CONFIGURATION OF ABAS
4.1. Configuration levels of Abas
The configuration of the release version has two levels.
The first configuration level includes the erpOSPrepare.sh script, which ensures the system requirements on the Abas server.
The erpOSPrepare.sh script, in turn, generates the "abasinst.env" configuration file, which is required for the subsequent call of "install-unix.sh" or "update-unix.sh".

If no "custom.config" is specified, the configuration is created exclusively from the standard configuration. In this case, the "abasinst.env" file only contains the values from the standard configuration.
If the installation of Abas (install-unix.sh) is called without a configuration file, the configuration is also determined from the standard configuration.
In the case of an upgrade, note that the specified HOMEDIR is evaluated first. Therefore, some variables (e.g., the HOMEDIR or the s3 and client user) are determined from the current installation and cannot be overwritten.
|
NOTE: When upgrading, system relevant parameters cannot be overwritten by a custom configuration or the standard configuration! |
4.2. The standard configuration
/mnt1/tools/abas/CDftp-2200r8n01/installConfig
abas.config
cloudconnect.config
dashboard.config
dms.config
fulltextsearch.config
helpsearch.config
icedaemon.config
rabbitmq.config
4.3. Adapt the configuration
/mnt1/tools/abas/CDftp-2200r8n01/custom.config
Thus, most of the values from the standard configuration can be overwritten.
|
NOTE: Never change the standard release! These changes will not be saved after the installation/upgrade and will be lost for further installations and configurations! This may lead to unexpected problems later in the installation/upgrade process and require complex analysis. |

Format of the configuration files
The format chosen for the configuration files included in the release version is "yml". With this format, the indentation of the individual parameters is important. Only spaces are allowed (no tabs). Each indentation level is later a part of the variable name.
Please remember this when creating or editing such files.
ABAS:
    DIRNAME:
        MOUNT: /mnt1
        BASE: abas
        S3: s3
    PORT:
        EDP: 6550
        DATMOD: 48392
ABAS_DIRNAME_MOUNT=/mnt1
ABAS_DIRNAME_BASE=abas
ABAS_DIRNAME_S3=s3
ABAS_PORT_EDP=6550
ABAS_PORT_DATMOD=48392
5. PREPARE INSTALLATION OF ABAS
This chapter describes the preparations for an installation or an upgrade of Abas. As of Version 2017r4 the erpOSPrepare.sh script facilitates manual preparatory work. It checks the fundamental installation or upgrade requirements, among other things. This chapter will show you what the script does, how it is called and which changes it makes to the system.
5.1. Configure the ssh daemon
ToDo: Check sshd_config (as the user root)
The script erpOSPrepare.sh checks the settings of sshd_config upon startup.It cancels at the end if the StrictModes setting in the file is not set to "no".
Why set "StrictModes no"?
StrictModes is used to check the permissions of the user. As Abas uses the group permissions to a great extent, StrictModes must be set to "no". With "StrictModes yes", the client users have no access to Homedir files, even though they belong to the same group (abas).


5.2. Prepare the installation with the erpOSPrepare.sh script
The following sections describe exactly what the script does. If errors occur, you can find further explanations and remedies under Troubleshooting erpOSPrepare.sh.
You can find detailed information in the appendix:
-
Overview: What does the erpOSPrepare.sh script do?, Call examples
-
Detailed description of all parameters of erpOSPrepate.sh as well as additional scripts for the creation of users and ssh keys.
ToDo: Call erpOSPrepare.sh script and check monitor output (as the user root)
The following section describes what the script does after the call . You can call the script without concern. After the call you will receive a monitor display with information to review or ToDos. The script will not actually be run until you actively confirm with "y" (yes). To just see what the script does, you must cancel with "n" (no)!
IMPORTANT:
-
For a clean install, use the script’s install option: "-i"
-
For an upgrade, use the upgrade option of the script: "-u".
-
*If you have not worked with the script before, it is important that you read the following sections of the appendix: Overview: What does the erpOSPrepare.sh script do, Call examples and Description of the parameters.
-
Executing the command will only check your system environment. The script does not yet change anything. The script displays what it will do on the monitor. Thoroughly review the monitor display!
-
Pay particular attention to the lines marked with "*" and "!" . The users and groups marked in this way will be overwritten. If you do not want this to happen, you must assign the parameters new values.
-
Only when everything is okay, confirm with "y" (yes) and thus start the script!
*Neuinstallation*
cd /mnt1/tools/abas/CDftp-2200r8n01/bin/
ABAS_JAVAPATH=/mnt1/java8 ./erpOSPrepare.sh -i
*Upgrade*
cd /mnt1/tools/abas/CDftp-2200r8n01/bin/
ABAS_JAVAPATH=/mnt1/java8 ./erpOSPrepare.sh -u -h /mnt1/abas/s3
Script checks wget
If the script freezes when checking "wget" and outputs the message "Try to install bootstrap package "wget" …", cancel the script. Check your internet access. You will find information about this under Troubleshooting problems with access to the Internet (wget, curl, …).
Script checks Selinux
The /etc/selinux/config file is checked. If selinux is not set to "disabled", you will get this output:


You must do the following, if the above output is displayed:
reboot
ssh root@ihr_servername
-
Call the script again
Note that the server takes some time to restart. Check whether the internet connection still works after the reboot.
cd /mnt1/tools/abas/CDftp-2200r8n01/bin/
ABAS_JAVAPATH=/mnt1/java8 ./erpOSPrepare.sh -i
cd /mnt1/tools/abas/CDftp-2200r8n01/bin/
ABAS_JAVAPATH=/mnt1/java8 ./erpOSPrepare.sh -u -h /mnt1/abas/s3
Screenshots of the script call
Do not yet confirm the entry at the end of the script with "y"! Read the following explanations first!


Important
If you have a "D" in the Docker root dir line, exit the script call using "n".
Edit the Docker root dir as described in the Change Docker root directory section.

In this case, multiple system services are configured in _/etc/services _ on port 6550. These can be Abas services (EDP) or other system services. The configuration script cannot determine this, as the name of the system service ("EDP" in this case) may have been changed.
The following message is displayed: "WARN: multiple services found in /etc/services!".
Check the ports and system services in /etc/services.
Ensure that there are no competing services on the specified port and change the configuration accordingly (port number in /etc/services and Abas variable).
ToDo: Start the installation process with erpOSPrepare.sh
|
Only run the script using "y" when you have checked Mountpoint, Javapath, Docker root dir and all lines with an asterisk and exclamation mark. Check whether Docker, Docker Compose standalone and Java are installed. You will save yourself time-consuming rework! |
The following is done by the erpOSPrepare.sh script after you confirm with "y":
-
The script starts checking the installation requirements. It does NOT install Abas!
-
Missing packages are installed and users, groups and ssh keys are created.
The following screenshot shows: packages are checked
-
In the following screenshot, you see the output by the script while checking the required packages.
-
The /mnt1/abas/ directory is created.
-
Packages which are missing (marked missing!) are installed if you confirm the query with "y".


|
Important Do not cancel the script! The missing packages are installed at line " == yum install …". This takes several minutes! |
Note:
-
As of version Abas 20 (2019r4), also the packages jq, sqlite3, locate, and git are installed automatically.
-
You can find all installed packages as well as possible errors in the log file:
</mnt1/tools/abas/CDftp2200r8n01>/Messages/tmp/checkPackage.log -
Check in the log file or by scrolling up if all packages were actually installed by the script. If a package is marked as "missing" at the end of the script run, you must install it manually.
You can only see the following screenshot if you scroll up.


Note on new installation:
All users are always newly created. Already existing users are deleted beforehand (users were previously marked with a *)!
Note on upgrade:
Only the new users are created. For all system users required for operating Abas (here, for example: s3, erp, demo, leer), it is expected that they already exist in the system. These users were previously marked with a *. These users are not newly created.
The passwords for newly created users are recorded in:
/mnt1/tools/abas/CDftp-2200r8n01/Messages/erpOSPrepare.passwd (if you did not deactivate the password assignment using the environment variable REMOVE_PASSWD=1 when calling the script).


A detailed description of which files and services have been executed or edited can be found in the next section Description of the files created or edited by the erpOSPrepare.sh script.
In the last line of the script output on the monitor, you can find the command for starting the Abas installation or upgrade process. Do not start the installation/upgrade until you have read the following section up to the chapter Installation Abas.
Messages/Notifications during the erpOSPrepare.sh script run


-
Java, Docker and Docker Compose standalone are "third-party tools". You must install these yourself! If a tool is marked as "missing", you must install it now.
-
You require Docker and Docker Compose standalone to use Multisite (RabbitMQ), Abas Service Planner and Abas PM to use Dashboard.
Information on error messages can be found under Troubleshooting erpOSPrepare.sh.
Description of the files created or edited by the erpOSPrepare.sh script
-
/mnt1/abas/abasinst.env (configuration file)
-
You can find detailed information about the file in the next section, where the actual installation of Abas begins.
-
/etc/security/limits.conf has been modified:

-
/etc/services:

-
/etc/group
Missing groups have been added (docker, …) -
/etc/sysconfig/selinux
selinux has been set to disabled, as the ssh keys can otherwise not be created-
SELINUX=disabled
-
-
/etc/sysctl.d/abas-protected_hardlinks.conf
File created with entry:-
fs.protected_hardlinks=0
-
-
/etc/sysctl.d/abas-disable_ipv6.conf
File created with entries:-
net.ipv6.conf.all.disable_ipv6 = 1
-
net.ipv6.conf.default.disable_ipv6 = 1
-
net.ipv6.conf.lo.disable_ipv6 = 1
-
Possibly missing subdirectories were created and assigned the correct rights in the "abas" directory


-
In each home directory of the users (demo, dms, erp, etc.), an .ssh directory will be created with the required keys, insofar as these did not already exist.
-
The file name "abas_install" is used to avoid overwriting any existing ssh keys.
The newly created files, such as ssh keys, cannot be deleted, as they are necessary for the administration of the Abas installation!
Using the created ssh keys, the following user changes can be performed on the Abas server: -
root → s3,dms,clients,…
-
s3 → bapps,dms,clients,…
-
Every user to himself (s3 → s3)
No unauthorized access from outside to the Abas server is possible with the users created by the script. If you want to allow access from outside, you must take additional action and add the required (external) public keys to the respective user under "authorized_keys".
These ssh keys are primarily required for the installation and upgrade. Additionally, they are necessary for administrative scripts (RabbitMQ etc.) as well as for system scripts (e.g., the table of variables reorganization must be able to start and stop RabbitMQ and IceDaemon via a system service).
5.3. DATA INTEGRITY OF THE CLIENTS
The data integrity of the clients must only be checked in the case of an upgrade. This step is not necessary for new installations.
ToDo: Emsure the data integrity of the clients
Check the integrity of the real client database by running a garbage collection for both logs:
-
starte_gc.sh <clientdir> 0 2>Messages/gc_0.err; echo Erfolg=$? # Log 0 GC
-
starte_gc.sh <clientdir> 1 2>Messages/gc_1.err; echo Erfolg=$? # Log 1 GC
6. CARRY OUT INSTALLATION
This chapter will show you the exact Abas installation process. The installation or upgrade process does not create any users in the system. This is exclusively done via the erpOSPrepare.sh script or the subscripts erpUserPrepare.sh and erpSSHPrepare.sh called by this script.
The following must be done before starting the Abas installation.
6.1. ToDo: Check whether Docker works
Before executing the install-unix.sh script, check if Docker is running and can be used correctly.
The _docker ps -a _ or _docker images _command must not lead to an error message. If errors occur, have a look at the Troubleshooting chapter to see what you can do.
6.2. ToDo: Log in as the user s3
ssh s3@ihrServername
6.3. ToDo: Set the workstation environment (as the user s3)
-
export TERM=vt220
6.4. ToDo: Check abasinst.env (as the user s3)
vi /mnt1/abas/abasinst.env
-
The abasinst.env configuration file was created by the erpOSPrepare.sh script.
-
The file includes your custom configuration and is required for the subsequent Abas installation.
-
The ports used are listed in the file.
-
You can define whether Abas DMS, RabbitMQ, etc. should also be installed.
0 - means will be installed
1 - means will not be installed -
Examples:
DO_NOT_INSTALL_RABBITMQ: 0 |
#RabbitMQ will be installed |
DO_NOT_INSTALL_ICEDAEMON: 0 |
#iceDaemon will be installed |
-
ATTENTION:
You cannot change the DIRNAMES and USERNAMES again in the CLIENT section. If you add a new name, you must create the user and ssh key for this name before calling install-unix.sh. -
Information on special case: If the component Abas DMS is set to "0" (i.e. it is to be installed), the following applies:
-
For Abas DMS, only the functionality of the required user is tested.
The required shared directory and the Samba configuration are created.
The dms user is added to Samba.
smbdms.conf is created, but still has to be added manually to Samba as include.
No further installation, for example of Habel, is carried out.
-
-
New entries such as KEYCLOAK, DASHBOARD, MONGODB, TENANT, LICENSECONTROLLER, … are described in the section Setting up the components (as the s3 user).
6.5. ToDo: Start the installation by calling install-unix.sh (as the user s3)
-
Check whether you are actually in the s3 directory as the user s3.
$HOME must show you /mnt1/abas/s3 or the mount point you use, for example, /mnt1/abas/s3. -
At the end of erpOSPRepare.sh you were shown how to start the installation process using the install-unix.sh script.
statt CDftp-2200r8n01 Ihren Pfad eingeben!

CUSTOM_CONFIG_YML=/mnt1/abas/abasinst.env JAVAPATH=/mnt1/java8 /mnt1/tools/abas/CDftp-2200r8n01/install-unix.sh
If the process gets stuck at "Load Abas package list …", you can check the log file to determine where the process is stuck:
/mnt1/abas/s3/tmp/checkPackage.log
=== ToDo: Press Return to confirm the installation directory image::Bilder_DurchfuehrungInstallation/Installationsverzeichnis_bestaetigen.png[]
=====================================
=     Installation Abas finshed     =
=         20250306 10:27:16         =
=====================================

   abas-ERP has been installed successfully
   Individual configurations are still neccessary:
       devices.txt, homedir.env, mandantdir.env ...

   To complete the installation, you must perform the following steps:
     1) Please logout and login again
     2) Run installation script for system services as root user:
         (contains zugriff.sh and installation of the license counting server)
         # /mnt/abas/s3/Messages/rootInstall/installAllScripts.sh
     3) Start the components-installer as s3 user to install all extra modules:
         (This step is NOT optional! Otherwise your installation will not be
         See installation instructions for further information.
You can find information on error messages in the Abas installation section.
The following must now be done:
===
ToDo: Custom adjustments (as the user s3)
There is generally nothing that needs to be adjusted for a new installation! You can check the following files:
-
devices.txt, homedir.env, mandantdir.env …
6.6. ToDo: Log out and log in again
Abmelden als User s3
exit

Einloggen als User s3
ssh s3@servername
6.8. ToDo: Run the installation script for system services (as the user root)
/mnt1/abas/s3/Messages/rootInstall/installAllScripts.sh

You can find log files with information on the installation in the /tmp/ directory.
[root@redhat8 abas]# ls -l /tmp/iceDaemon_admin.sh.log
-rw-r--r-- 1 root root 4694 24. Jul  12:13 /tmp/iceDaemon_admin.sh.log
Error messages when stopping iceDeamon (service stop … failed!) occur if iceDeamon has not been started yet and therefore cannot be stopped.
|
Note: The installation script generates the file smb.conf for every client. The file of every client is automatically entered as include in the Samba server. After calling installAllScripts.sh, the Samba shares of all clients are automatically available. |

6.9. ToDo: Generate the tenant ID
-
If you do not have a tenant ID yet, refer to the documentation to find out how to get one.
-
Use the same login data as for the Abas extranet. If these do not work, you have to click the "Accept access data" button on this page.
-
Note that only lowercase letters can be used for the name and currently only "Database" should be selected in the "Auth0 Connection" field.

-
For more detailed information, refer to the documentation specified above.
The tenant ID can be entered in the abasinst.env already before installing Abas:
-
After calling erpOSPrepare.sh., open the generated config file (in our instructions: /mnt1/abas/s3/Messages/config/abasinst.env)
-
Add your tenant ID at the end of the file:
TENANT_IDENTITY_PROPERTIES_B64CONFIGURATIONSTRING="eyJ0ZW5hbnQi…."

tenant_identity: The tenant_identity contains all information which is required to create a tenant. A tenant is an account to use a public cloud resource.
license_controller: Check the Abas and Abas Dashboard licenses for validity.
keycloak: Open source solution for user authentication. A connection of the LDAP or AD is possible.
oauth2: Selection of the hybrid cloud or on-premise scenario.
rest_api: Installation of the Abas REST interface for data communication with the web server. Link REST API documentation. Can also be used for your own purposes.
jwt_auth_userinfo: The JSON Web Token (JWT) is responsible for authentication when using single-sign-on (SSO). Thus, the user has to enter credentials only in one central place and not for every UI.
client_config: Creates the config file in the client. In this way, the client knows how to access the license server.
Mongodb: Setup of a NoSQL database for the Dashboard module
Dashboard: Installation of the dashboard. A personal cockpit can be created using which you can quickly access information and applications required for your daily work.
webserver: Nginx server serves as a proxy for the individual components (e.g., Dashboard, REST API or BPM)
6.10. ToDo: Integrate Dashboard into the GUI
-
In the Abas native GUI, go to the admin password definition and set the following under the "GUI" tab:
-
Set the start page adjacent to command overview to "URL".
-
Enter the URL for the dashboard start page under the URL subtab (e.g., http://<hostname>:<portnummer>/dashboard-v3)
-
Click the Open in browser button to display the Abas Dashboard start page
-
-
Log in to the Abas native GUI again. After the login, the Dashboard start page should be displayed on the right.
6.11. Set up Web Client (add-on)
If you would like to use the Web Client - our browser-based user interface for Abas - please follow the corresponding installation instructions.
7. Systemd
7.1. Basics
Experienced administrators can generally administer systemd services using the tools provided by the operating system. The script systemServices_admin.sh presented here serves to simplify the installation of systemd services that are required by Abas.
With this script you can:
-
View all installed Abas system services
-
Output the status of Abas system services
-
Generate EDP and DATMOD unit files
-
Install system services
-
Remove installed system services
 systemServices_admin.sh [-d] [-h <homedir] [--force]
                        --unit <unitname> [--port <port>] --type EDP|DATMOD|SERVICE
                        --build:    Build systemd unit files (EDP or DATMOD only)
                        --install:  Install systemd unit
                        --remove:   Remove systemd unit from OS (option --force required!)
                        --s3user <s3 user name>:  Name of Abas s3 user
                        --status:   Output systemd unit status
                        --list:     List all Abas systemd units (default)
                        --scriptdir <dir>:   Directory for the systemd unit files. Default:
                              HOMEDIR/Messages/rootInstall (if HOMEDIR is set and HOMEDIR/Messages exist)
                              /m/dev-29/mg1/tmp/systemdscripts (otherwise)
The script requires the specification of a unit name (--unit) and the type of application (--type). In some cases, the s3 user (--s3user) and the homedir (-h) are also required. The s3 user and the homedir can basically be adopted from the environment, as long as the s3 user’s current environment has been loaded. If no environment is available, these parameters must be passed.
eval $(sh ./denv.sh)
The unit name (--unit) is a freely selectable name under which the service is registered in the system. The names of the service files are also determined in this way. Note that the names of the system services must be unique. Two services with the same name cannot be installed/registered. For example, "edp" twice. The second system service must then be assigned a unique name, such as “edp2”.
There are three special variants for the application type (--type) in the Abas environment:
-
EDP (Abas system service "edp", unit file is generated)
-
DATMOD (Abas system service "datmod", unit file is generated)
-
SERVICE (all other Abas system services, unit file must be available as a template)
7.2. Administer systemd services
7.2.1. View all installed Abas system services
If you call the script without options or with --list, you will receive a list of all Abas systemd services.
You can list the system services as the root user or s3 user.
s3@debian:/mnt/abas/s3# ./bin/systemServices_admin.sh --list
   oder
s3@debian:/mnt/abas/s3# ./bin/systemServices_admin.sh
   Systemd services for Abas (s3)
===================================================
  s3-help-s3.service                                                                                    loaded active running   jetty for abas-lucene
  s3-ice-erp.service                                                                                    loaded active running   icedaemon
  s3-ice-s3.service                                                                                     loaded active running   icedaemon
  s3-rabbitmq.service                                                                                   loaded active running   RabbitMQ

   Other systemd services for Abas
===================================================
  countserver.service                                                                                   loaded active running   supervise license usage for Abas installations
  countserver.socket                                                                                    loaded active running   socket for countserver, the service supervising license usage in Abas.
  datmod.socket                                                                                         loaded active listening datmod socket
  edp.socket                                                                                            loaded active listening edp socket
If you were to execute the above call with a different "s3" user, system services would be missing from the output. The system services specified above are not installed for this second "s3" user.
root@debian:/mnt/abas/s3# ./bin/systemServices_admin.sh --list --s3user s4
   Systemd services for Abas (s4)
===================================================

   Other systemd services for Abas
===================================================
  countserver.service                                                                                   loaded active running   supervise license usage for Abas installations
  countserver.socket                                                                                    loaded active running   socket for countserver, the service supervising license usage in Abas.
  datmod.socket                                                                                         loaded active listening datmod socket
  edp.socket                                                                                            loaded active listening edp socket
  edp2.socket                                                                                           loaded active listening edp2 socket
7.2.2. Output the status of Abas system services
Systemd works with so-called “units”. The names of the system services listed under 2.1 are such “units”. For example, "s3-help-s3.service" or "s3-ice-erp.service"
The status of an Abas system service can be output as the root user or s3 user.
s3@debian:~$ ./bin/systemServices_admin.sh --unit s3-ice-erp --type SERVICE --status
Examine service (/etc/systemd/system/s3-ice-erp.service*):
  Check servicefile s3-ice-erp.service			exists!
* s3-ice-erp.service - icedaemon
     Loaded: loaded (/etc/systemd/system/s3-ice-erp.service; enabled; preset: enabled)
     Active: active (running) since Tue 2023-11-21 10:54:27 CET; 6 days ago
   Main PID: 504 (ssh)
      Tasks: 1 (limit: 3513)
     Memory: 2.3M
        CPU: 480ms
     CGroup: /system.slice/s3-ice-erp.service
             `-504 ssh -p 22 -o BatchMode=yes -o StrictHostKeyChecking=no erp@debian "cd ~ && eval \$(sh ./denv.sh) && \${HOMEDIR}/incrementalExport/daemon/bin/icedaemon-service -a start -s \${RABBITMQ_HOSTNAME} -t \${RABBITMQ_PORT} -v abas-iced-erp -e \$(envmake -x . -q MANDANTDIR) -f \${HOMEDIR}/iceDaemon/erp"
In this example, the system service is loaded and active (running).
7.2.3. Create and install a systemd EDP service
To install systemd services, you must be the root user (or a user who has sudo rights)!
To install a systemd service, there must be the necessary .service and/or .socket files. For the EDP and DATMOD system services, the systemServices_admins.sh script can generate these files itself. For all other services, they must be created in a different way and then passed to systemServices_admin.sh as a parameter so that the service can be installed in the operating system.
In order to create EDP and DATMOD services, the HOMEDIR of the installation must be known. This can be an existing installation (then integrate the s3 environment as the root user) or a new installation (then set the future HOMEDIR as a parameter).
Building the systemd scripts (EDP and DATMOD only!)
To build the unit files, the HOMEDIR, the s3 user and the port to be assigned are required. The systemd unit files can only be built for the EDP and DATMOD services using the systemServices_admin.sh script.
root@debian:/mnt/abas/s3# ./bin/systemServices_admin.sh -h /mnt/abas/s4 --s3user s4 --unit edp2 --type EDP --port 6555 --build
Systemd scripts were created in:  /tmp/systemdscripts

root@debian:/mnt/abas/s3# ls -l /tmp/systemdscripts
insgesamt 8
-rw-r--r-- 1 root root 107 28. Nov  14:43 edp2.socket
-rw-r--r-- 1 root root 296 28. Nov  14:43 edp2@.service
In this case, the two necessary files (edp2.socket and edp2.service) with the specified unit name edp2 are created in the temporary directory (/tmp/systemdscripts) because the specified homedir does not yet exist and no script dir was specified with --scriptdir.
Installation of the systemd service
For the installation, the scripts in this example are expected to be under /tmp/systemdscripts. All that is needed is the unit name and the type.
root@debian:/mnt/abas/s3# ./bin/systemServices_admin.sh -h /mnt/abas/s4 --s3user s4 --unit edp2 --type EDP --install
  Check template edp2.socket                ok
  Check template edp2@.service              ok
Check general server port (6555)            free
Examine service (/etc/systemd/system/edp2.socket*):
  Unit listening on port 6555               not found
  Check servicefile edp2.socket             new
  Check servicefile edp2@.service           new
Install systemd service "edp2.socket":
Created symlink /etc/systemd/system/sockets.target.wants/edp2.socket -> /etc/systemd/system/edp2.socket.
     Active: active (listening) since Tue 2023-12-05 13:12:47 CET; 5s ago
You can also specify the location of the system files to the installation script using the --scriptdir parameter.
Installation of a system service from provided templates
The system services for other Abas services (Help, IceDaemon, RabbitMQ, etc.) are generated during an installation/upgrade by the corresponding xxxx_admin.sh scripts and stored under HOMEDIR/Messages/rootInstall. In addition to the installation script, you will find two configuration files for each of these services under Messages/rootInstall.
Below you will find an example of an Abas system service (IceDaemon for the client erp). What is required here is the service file for the s3-ice-erp.service unit and a file with s3-ice-erp environment variables. The environment variables are loaded into the service file via the “EnvironmentFile” parameter.
The files were stored under the “/mnt/abas/s3/Messages/rootInstall” directory.
[Unit]
Description=icedaemon
After=network-online.target sshd.service s3-rabbitmq

[Service]
EnvironmentFile=/etc/sysconfig/s3-ice-erp
ExecStart=/bin/sh -c "ssh -p ${PORT} -o BatchMode=yes -o StrictHostKeyChecking=no ${USER}@${HOST} \"cd ~ && ${START_CMD}\""
ExecStop=/bin/sh -c "ssh -p ${PORT} -o BatchMode=yes -o StrictHostKeyChecking=no ${USER}@${HOST} \"cd ~ && ${STOP_CMD}\""
KillMode=process

[Install]
WantedBy=multi-user.target
USER=erp
HOST=debian
PORT=22
HOMEDIR=/mnt/abas/s3

START_CMD='eval \$(sh ./denv.sh) && \${HOMEDIR}/incrementalExport/daemon/bin/icedaemon-service -a start -s \${RABBITMQ_HOSTNAME} -t \${RABBITMQ_PORT} -v abas-iced-erp -e \$(envmake -x . -q MANDANTDIR) -f \${HOMEDIR}/iceDaemon/erp'
STOP_CMD='eval \$(sh ./denv.sh) && \${HOMEDIR}/incrementalExport/daemon/bin/icedaemon-service -a stop -s \${RABBITMQ_HOSTNAME} -t \${RABBITMQ_PORT} -v abas-iced-erp -e \$(envmake -x . -q MANDANTDIR) -f \${HOMEDIR}/iceDaemon/erp'
PAUSE_CMD='eval \$(sh ./denv.sh) && \${HOMEDIR}/incrementalExport/daemon/bin/icedaemon-service -a pause'
CONTINUE_CMD='eval \$(sh ./denv.sh) && \${HOMEDIR}/incrementalExport/daemon/bin/icedaemon-service -a continue'
The generated template files can then be installed as follows.
root@debian:/mnt/abas/s3# ./bin/systemServices_admin.sh --install --unit s3-ice-erp --type SERVICE --scriptdir /mnt/abas/s3/Messages/rootInstall -h /mnt/abas/s3
7.2.4. Removing Abas systemd services
To remove systemd services, you must be the root user (or a user who has sudo rights)!
To remove a systemd service, the unit name and type are expected as arguments. The removal is started via --remove and must be forced with the --force option.
root@debian:/mnt/abas/s3# ./bin/systemServices_admin.sh --unit edp2 --type EDP --remove --force
Remove systemd service "edp2.socket"
Removed "/etc/systemd/system/sockets.target.wants/edp2.socket".
7.3. List of commands for managing systemd services
For detailed documentation about systemd services, please read the relevant specialist literature from, for example, RedHat. Listed here you will find a few commands that are frequently required for the administration of "systemd".
    systemctl list-units
    systemctl list-sockets
    systemctl list-unit-files
    systemctl list-unit-files --type service
    systemctl list-unit-files --type socket
systemctl daemon-reload
systemd-analyze blame
    systemctl enable <Dienstname>
    systemctl start <Dienstname>
    systemctl stop <Dienstname>
    systemctl status <Dienstname>
7.4. List of Abas system services
The unit files can be generated for the following Abas system services.
Generated by help_admin.sh
Must be installed as the type SERVICE.
Generated by iceDaemon_admin.sh
Must be installed as the type SERVICE.
Generated by rabbit_admin.sh
Must be installed as the type SERVICE.
Generated by systemServices_admin.sh
Must be installed as the type EDP.
Generated by systemServices_admin.sh
Must be installed as the type DATMOD.
Is provided using the countserver.tgz delivery archive
It is installed using the shell script available in the archive.
8. Installation of the components
Abas 2024.Q3 is delivered with Components Version 1. You can find the documentation here :Components Version 1 Documentation
| Alternatively, you can download and install a newer version of the components. An overview of the available versions can be found here: Overview of component versions |
9. TROUBLESHOOTING
9.1. erpOSPRepare.sh
Script was run without or with incorrect parameters and should be restarted.
In the following, we presume that the erpOSPrepare.sh script has run through and that you want to start the script for a second time.
Note:
If a configuration file erpOSPrepare.cfg is in the bin directory, this cfg is always used. It has precedence over the input of parameters directly in the shell.
Note:
If the script is called with the wrong mount point or without this parameter, it will not help to run the script again with the correct parameters. The generated files and directories must be deleted first (back up beforehand).
It is easiest if you have created a snapshot of the status before calling the script. You can run the script with the new parameters after importing the snapshot.
-
If called again, the script displays the users and groups which already exist.
It marks them (in the monitor display) and deletes them when running the script (in installation mode -i). -
If directory and file names are changed in the second script call, the old directories and files will remain in place and will not be used further.
For example, if you specified the mount point using /u/ and now change it to /mn1/, then the /u/ directory will remain in place and the /mnt1/ directory is recreated. Back up the old directory and then delete it.
If different mount points such as /u/ and /mnt1/ exist, it leads to conflicts and errors during the installation! -
ToDos for avoiding errors:
-
Check the Docker root directory (Docker root dir).
If you call the script for a second time using a different mount point, the Docker root dir is not automatically adjusted. You must amend the root directory as described under Troubleshooting Docker and Docker Compose standalone. -
Check the directory names in the files
/etc/xinetd.d/edp
/etc/xinetd.d/datmod
/etc/passwd (the user must be deleted and recreated if incorrect directories exist)
/etc/group
-
   Add root-user key                 [OK]
   Add own key                       [OK]
   Check ssh-login [root to s3]      [Failed]
Possibly error reason:  StrictModes on (change /etc/ssh/sshd_config and restart ssh server).
erpSSHPrepare.sh: ssh login for user s3 must work. Otherwise the installation can not be continued.
[root@redhat8 bin]#
This message is displayed if StrictModes is not set correctly in the sshd_config file. StictModes must be set to "no"! Follow the instructions under the sshd_config section.
Message: Could not add user "s3" to group docker
Message: e.g., user s3, rabbitmq cannot be added to group docker.
-
The message appears if Docker has not been installed.
ToDo:
-
Install Docker and Docker Compose standalone before installing Abas (if you want to use Multisite (RabbitMQ), Abas Service Planner and Abas PM).
-
Then manually enter the users s3 and rabbitmq in the group docker.
Message: No login possible for these users …
Kein login moeglich fuer diese Benutzer: rabbitmq
you must create both the login and the ssh key for the users named. There are two scripts on the installation CD to assist administration:
-
erpUserPrepare.sh and
-
erpSSHPrepare.sh
Run the scripts for the users as follows:
$ cd <CD-Installationsverzeichnis>
# Alternativ
$ cd $HOMEDIR
Create user "rabbitmq".
.Hier im Beispiel ist der Name der zugehörigen Gruppe "abas". Das muss evtl. geändert werden.
$ ./bin/erpUserPrepare.sh -u rabbitmq -g abas
If you use a user other than "s3", you must change it here!
If you use a group other than "abas", you must change it here!
$ ./bin/erpSSHPrepare.sh -u root -g root
$ ./bin/erpSSHPrepare.sh -u s3 -s s3 -g abas
$ ./bin/erpSSHPrepare.sh -u rabbitmq -s s3 -g abas
9.2. Abas DMS installation
|
Warning: At the end of the installation process you must scroll up to see these messages. |
Message: Install ice daemon failed, Start rabbitMQ failed …
If the error message "Install ice daemon failed" or "Start rabbitMQ failed" is displayed after calling the install-unix.sh script, you can find information on the cause under /mnt1/abas/s3/Messages/ in the corresponding log file.
-
If the missing Docker installation is the cause, Docker and Docker Compose standalone must be installed.
-
If these errors occur even though Docker is installed, check if Docker starts automatically after a reboot. If not, you can find the instructions for installing Docker CE (Community Edition) and Docker Compose standalone in the appendix and the section Automatically start Docker.
-
If RabbitMQ and IceDaemon are not installed yet, you must install them now.
9.3. Abas upgrade

Cause
Before the upgrade starts, a check is automatically performed to determine whether the database is closed correctly. This is done by writing a last check point in the database.
If the check point can’t be written in the database, the database is not ready for the upgrade.
Possible causes are:
-
The database was copied incorrectly
-
There is still an active login in the client (this can also be cron jobs or similar).
Remedy
To ensure a correctly closed database is available for the upgrade, check whether applications are still active in the client.
Then close all existing applications.
Afterward, perform a controlled startup of the database (log in to the client) and close the application again.
.Sobald der Prozess "datmod" beendet ist, ist die Datenbank bereit für das Upgrade:
# Muss 0 liefern!
psg datmod | wc -l
9.4. Docker and Docker Compose standalone
Message: Docker root dir failed
  Archname              ABAS_ARCHNAME                   x86_64_linux
  Javapath              ABAS_JAVAPATH                   /java-8-oracle
  Docker root dir                                       failed
A reason might be that the Docker root environment has been entered in the daemon.json as well as in the docker.service.
If you have newly created the daemon.json as the configuration file, you should restore the standard in the old configuration file /lib/systemd/system/docker.service. Your entry for docker-root must be commented out so that it is no longer used.
#ExecStart=/usr/bin/dockerd -g /mnt1/docker
ExecStart=/usr/bin/dockerd -H fd:// --containerd=/run/containerd/containerd.sock
# Variante a) Konfiguration im Docker-Daemon neu einlesen
#  Nur die neu gestarteten Docker-Container erhalten die geänderte Konfiguration
#  Alle laufenden Container sind nicht betroffen (haben weiterhin den alten Zustand)
*systemctl reload docker*

# Variante b) Docker-Daemon als root-Benutzer neu starten
#  ACHTUNG: Alle laufenden Container werden beendet!
#  Damit die Änderungen für alle Container wirksam werden, müssen die Container nach dieser
#  Operation neu erstellt werden. Die bestehenden Container neu starten reicht nicht aus!
*systemctl restart docker* +
systemctl start docker triggers error message
The following error message is displayed when starting Docker: "Job for docker.service failed because the control process exited with error code. See "systemctl status docker.service" and "journalctl -xe" for details."
Check the docker.service configuration file as described in the above section Message Docker root dir failed.
Message: The base directory of Docker cannot be in the root area
Default: /var/lib/docker
As this area is too small, Docker must be moved to a larger partition. The guide for this can be found in the Change the Docker root directory section.
Docker containers are under /var/lib/docker.
When changing the Docker root area, there should not be any containers under /var/lib/docker, as it is a new installation.
If there are Docker containers under /var/lib/docker, these must now be shut down and the Docker service ended using "systemctl stop docker". Then copy everything from /var/lib/docker to /mnt1/docker.
rsync -ravHp –progress –stats /var/lib/docker /mnt1
Afterward, start Docker so that the change takes effect.
9.5. General
Cannot set hard link
With newer kernels (as of Kernel 3.6), a user can only set a hard link to a file if this file belongs to the user or they have read and write permissions for the file (either through group permissions or the permissions for users other than the owner or owner group).
If you have this type of kernel, there is the file
/proc/sys/fs/protected_hardlinks
echo "0" > /proc/sys/fs/protected_hardlinks
fs.protected_hardlinks=0
chcon -R --type=ssh_home_t .ssh
Problems with internet access (wget, curl, etc.)
wget is not installed
yum install wget
erpOSPrepapre.sh or checkPackages.sh script reports errors
The script reports a lack of access to registry.abas.sh (URL registry.abas.sh is only used to test internet access)

-
Missing internet access can, for example, be due to a firewall
-
If you use proxy servers, set up a working internet connection.
-
For this, store the proxy configuration for http, https and ftp centrally in /etc/environment and in /etc/yum.conf (a detailed description can be found in the following section).
Set up the /etc/environment file (all operating systems)
#HTTP
http_proxy=http://ihrProxyserver:Port
HTTP_PROXY=http://ihrProxyserver:Port
#HTTPS
https_proxy=http://ihrProxyserver:Port
HTTPS_PROXY=http://ihrProxyserver:Port
#FTP
ftp_proxy=http://ihrProxyserver:Port
FTP_PROXY=http://ihrProxyserver:Port
|
NOTE After saving, must log out and back in in order for the changes to take effect! |
wget for RedHat
It is not sufficient to make an entry in /etc/environment for several commands. You must also enter a proxy server in yum.conf.

If there are still problems accessing the internet, you can also enter the proxy server in the wgetrc file.
http_proxy=http://ihrProxyServer:Port
https_proxy=http://ihrProxyserver:Port
ftp_proxy=http://ihrProxyserver:Port
Set up wget for Debian
Acquire::http::Proxy "http://ihrProxyserver:Port";
Acquire::https::Proxy "http://ihrProxyserver:Port";
Acquire::ftp::Proxy "http://ihrProxyserver:Port";
10. ATTACHMENT
10.1. Install Java (as the root user)
We highly recommend installing Java before calling the erpOSPrepare.sh script. This will save time-consuming manual rework after installation!
The installation of the free OpenJDK17 version is explained below. You can find currently approved Java versions for Abas on extranet.abas.de.
# Prüfen der Java-Version
java -version
openjdk version "17.0.6" 2023-01-17
OpenJDK Runtime Environment (build 17.0.6+10-Debian-1deb11u1)
OpenJDK 64-Bit Server VM (build 17.0.6+10-Debian-1deb11u1, mixed mode, sharing)
Set the Java path with a symbolic link to /mnt1/java17:
# Verzeichnispfad durch eigenen ersetzen!
ln -s /usr/lib/jvm/java-17-openjdk-amd64 /mnt1/java17
|
Note: In the guide, the Java path is redirected to /mnt1/java17. Advantage: For data backup, simply the /mnt1/ directory can be backed up. When copying an installation, it’s also easier to create the entire Abas installation by copying the /mnt1/ directory. Since the /mnt1/java17 directory is a symbolic link, the data backup must be performed with the appropriate TAR command, which also includes symbolic links in the TAR file. |
10.2. Installation OpenJDK 17
Java version 17 is required to operate Abas.
10.2.1. Debian 11
apt-get install openjdk-17-jdk
10.2.2. RedHat 8
yum install java-17-openjdk-devel
10.3. Installation Docker CE (Community Edition) and Docker Compose standalone
|
Without Docker, dashboards, Multisite (RabbitMQ), Abas Service Planner, and Abas PM do not work. |
Docker and Docker Compose standalone are mandatory for the operation of Abas.
It is not possible to install these two third-party tools automatically with erpOSPrepapre.sh or checkPackages.sh.
A system administrator must install these two programs on the Abas server before installing or upgrading Abas.
Check the necessary internet connection!
10.4. Docker installation
Official Docker website with installation guide
|
Always use the most up-to-date guide on the Docker website: |
-
Installation Docker CE (Community Edition) for Debian: https://docs.docker.com/install/linux/docker-ce/debian/
-
Docker installation for RedHat: There are several installation solutions for RedHat. Please read the information "Red Hat Enterprise Linux requires Docker Enterprise Edition" (in German and English) in the Community from 6/2/17 with amendment from 7/6/17 and 9/7/17.
Automatically start Docker (Start docker on boot)
Docker CE (Community Edition) must also be set up so that it is automatically restarted after a reboot.
For call, see:
https://docs.docker.com/install/linux/linux-postinstall/#configure-docker-to-start-on-boot -→ "Configure Docker to start on boot" section.
Set HTTP proxy for Docker CE (Community Edition) (if you work with proxy)
If you use http/https proxies, you must create an appropriate configuration file.
Follow the guide on the Docker website: https://docs.docker.com/config/daemon/systemd/httphttps-proxy -→ "HTTP/HTTPS proxy" section.
There, you can find a detailed description of how to create a new directory and a configuration file and which content the configuration file must have.
After entering your proxy server in the configuration file, proceed with the next step:
|
NOTE If you restart the Docker daemon, ALL running containers on the server end. |
systemctl daemon-reload
systemctl restart docker
systemctl show --property=Environment docker
If there is no output, the proxy entry is not correct or the configuration file is not in the correct location.
ToDo: Change the Docker root directory
Docker stores its data and containers under /var/lib/docker by default.
As this area is too small, the Docker root area must be moved to a larger partition. The erpOSPrepare.sh script cancels the installation if you did not change the Docker root.
For current Docker versions (from 17.x.x), the old configuration of the Docker root environment (in /etc/default/docker or /lib/systemd/system/docker.service) can no longer be recommended. With every Docker upgrade, these files are replaced by the standard Docker values. Individual changes will be lost, which may lead to Docker being moved back to the (too small) standard root partition.
Change root directory
mkdir -p /mnt1/docker/vi /etc/docker/daemon.json{
"data-root":"/mnt1/docker/"
}ToDo: Limit the log output of Docker
Docker containers may write much log output to the hard disk. To prevent that the hard disk becomes full (Abas may stop completely!!) limiting the logging of Docker is recommended.
Amend the "/etc/docker/daemon.json" file so that it looks like this:
.Beachten Sie unten im Code das zusätzliche Komma am Ende von data-root!
{
"data-root":"/mnt1/docker/",
"log-driver": "json-file",
"log-opts": {
"max-size": "100m",
"max-file": "5"
}
}
-
max-size: Specify the maximum size of a log file here (100MB in the example).
-
max-file: Enter the maximum log files to be saved here (in the example 5). This results in a maximum disk space per container (!!) of 100MB * 5 = 500MB for logging.
You can find the log files in the following directory:
/path/to/docker/engine/containers/<container-id>
The names are formed as follows:
<container-id>-json.log ⇐== active log file
<container-id>-json.log.1
<container-id>-json.log.2
etc.
Thus, the default logging is set for all containers. Note that every container can be started with individual log options which overwrite this default logging.
See also: https://docs.docker.com/config/daemon/
ToDo: Restart the Docker daemon
If you make changes to the Docker configuration (e.g., the daemon.json mentioned above), you have to restart the Docker daemon for the changes to take effect.
First try a "reload" to just read in the configuration again. If you are sure that all Docker containers that are still running belong to the installation you are administering, you can safely execute a "restart" or "stop" and "start".
|
NOTE If you restart the Docker daemon, ALL running containers on the server end!! |
systemctl daemon-reload
systemctl stop docker
systemctl start docker
systemctl status docker
Active: active (running) since ...
docker info | grep Root
Docker Root Dir: /mnt1/docker
Run Docker as non-root user
You don’t need to do anything (the following explanation is for understanding only):
Docker must also run under the user s3. The user s3 will be automatically added to the docker-group by the erpOSPrepare.sh script.
If the user s3 is missing in the docker-group, run the command below.
-
Docker has already been entered in /etc/group/ by the Docker installation.
-
The following command is executed as the user root by the erpOSPrepare.sh script:
usermod -aG docker s3
10.5. Installation Docker Compose standalone
Always use the current installation guide on the Docker website:
-
It is necessary to install the linked standalone version of Docker Compose standalone
-
Check the Docker Compose standalone version (the Docker Compose standalone version must be displayed afterwards, without error messages!)
docker-compose --version
If the call with curl does not work
You can start the call with pip. epel-release and python-pip may have to be installed beforehand.
|
*Warning: Install Docker Compose standalone only with curl or pip and never as a shipping container! |
yum install epel-release
yum install -y python-pip
pip install docker-compose
yum upgrade python*
10.6. Explanation of the erpOSPrepare.sh script
What does the erpOSPrepare.sh script do?
-
You can use the script for new Abas installations (call with -i) and upgrades (call with -u).
-
It is located in the bin directory: /mnt1/tools/abas/CDftp-2200r8n02/bin/.
-
The script creates all required users.
-
With the value "-", you can define for certain parameters that their values are omitted (e.g. certain users are not created).
-
The script creates ssh keys (each below the corresponding directory), which are named abas_install so that there is no conflict with existing keys.
-
The script checks the completeness of the packages and installs the missing packages, with the exception of third-party software, e.g., Java, Docker, and Docker Compose standalone.
-
The script creates necessary system files with the preferred entries and directory names, which you previously had to change manually, e.g., xinet.d/edp ; xinet.d/datmod.
-
You can pass different parameters to the script to customize the installation according to individual requirements.
-
The Mountpoint parameter and Java path must always be specified.
-
You can adapt parameters in the erpOSPrepare.cfg configuration file, which the script automatically reads. This is useful if you, e.g., pass many parameters or perform many installations with the same parameters .
-
The "erpOSPrepare.sh" script calls multiple subscripts, which fulfill the tasks described above.
-
checkPackages.sh (checks package lists and installs them)
-
distritest.sh (checks operating system)
-
erpSSHPrepare.sh (creates ssh keys)
-
erpUserPrepare.sh (creates users and groups)
-
-
Subscripts can also be called separately as necessary, for example, if additional users or ssh keys should be created (examples can be found in the appendix under Additional scripts for user and SSH installations).
-
"erpOSPrepare.sh" requires the commands wget, netstat, addgroup. If these are not yet available on the system, it is attempted to automatically install them afterwards.
-
The script checks whether access to the internet is possible through a proxy server, for example. Access is necessary to retrieve missing packages from the internet.
-
The script checks the settings in sshd_config and of selinux.
General call (as the user root)
ABAS_JAVAPATH=/path/to/java [Parameter...] ./erpOSPrepare.sh -u -h /path/to/homedir
-i  verwenden für Neuinstallation
-u  nur für Upgrade verwenden
In the next chapter, you can find a detailed description of all parameters of erpOSPrepate.sh as well as additional scripts for the creation of users and ssh keys.
Call examples
Example 1 (standard)
-
"mnt1" is used as the mount point
-
Javapath is set to /mnt1/java8 in this example here. Adjust this path accordingly.
-
Passwords for s3, demo, erp etc. are stored in a separate file /mnt1/tools/abas/CDftp-2200r8n02/bin/erpOSPrepare.passwd.
cd /mnt1/tools/abas/CDftp-2200r8n02/bin/
ABAS_DIRNAME_MOUNT=/mnt1 ABAS_JAVAPATH=/mnt1/java8 ./erpOSPrepare.sh -u -h /path/to/homedir
Example 2
ABAS_DIRNAME_MOUNT=/mnt1 ABAS_JAVAPATH=/mnt1/java8 ABAS_PORT_EDP=6551 ./erpOSPrepare.sh -i +
Example 3
In addition, call using the parameter REMOVE_PASSWD=1 if the passwords are not to be generated automatically.
The users will not be assigned a password -→ not recommended!!!
ABAS_DIRNAME_MOUNT=/mnt1 ABAS_JAVAPATH=/mnt1/java8 REMOVE_PASSWD=1 ./erpOSPrepare.sh -i
Description of the parameters for erpOSPrepare.sh
You can use the parameters below when calling the erpOSPRrepare.sh script. You can keep the standard values or assign custom values to the parameters. The explanation in the right column refers to the entries in the "Values" column. If you use other values, for example, mount point is not /mnt1 but /u, you must adjust the description text to your value.
Mount point |
ABAS_DIRNAME_MOUNT |
/mnt1 |
|
Base directory |
ABAS_DIRNAME_BASE |
abas |
|
s3 directory |
ABAS_DIRNAME_S3 |
s3 |
|
nobackup directory |
ABAS_DIRNAME_NOBACKUP |
Important:
If you work with multiple clients, they block each other. |
|
INSTALLPATH=/mnt1/abas/s3 |
|
||
Default password |
ABAS_DEFAULT_PASSWD |
abas |
|
s3 user |
ABAS_USERNAME_S3 |
s3 |
|
ruby user |
ABAS_USERNAME_RUBY |
help user |
ABAS_USERNAME_HELP |
1. hilfe |
Regarding point 1 * The preset value is "hilfe" * The HOME of the "hilfe" user is in the s3 directory. It is necessary for administrative purposes such as restart, client copy, etc. * The user "hilfe" will be created under /etc/passwd and has its HOME in the /mnt1/abas/s3 directory * The user "hilfe" does not have an ssh key Regarding point 2 * The user will not be created with the value "-". |
Extra user |
ABAS_EXTRA_USERNAMES |
* Can be used to create customer-specific users |
icedaemon user |
ICEDAEMON_USERNAME |
|
s3 |
* User under which IceDaemon is administrated. * Usually, this is always the user s3. |
rabbitmq user |
RABBITMQ_USERNAME |
1. rabbitmq 2. Value "-" |
Regarding point 1 * The preset value is "rabbitmq" * The user is required for the installation of RabbitMQ, for example, for the use of Multisite. * The user "rabbitmq" will be created in /etc/passwd * ssh key will be recorded in: /mnt1/abas/rabbitmq/.ssh/ Regarding point 2 * The user will not be created with the value "-". |
rabbitmq port |
RABBITMQ_PORT |
5672 |
* Belongs to RabbitMQ installation * The preset port is 5672. * The port can be changed. |
rabbitmq system file |
RABBITMQ_SERVICEFILE_ BASENAME |
rabbitmq |
* The preset value is "rabbitmq". * The name can be changed. |
docker container name: s3_rabbitmq |
|
* This is only an informative parameter so you know the name of the Docker container and can find it again. * The name is composed of ABAS_USERNAME_S3 and RABBITMQ_SERVICEFILE_BASENAME |
Client directories |
ABAS_CLIENT_DIRNAMES |
|
erp demo empty |
* Generally, three clients erp, demo and leer will be created. * Further clients can be added separated by a space; for example, erp demo leer erp-test * Important: The number of client directories and client user names must always correspond. |
Client user names |
ABAS_CLIENT_USERNAMES |
1. erp demo leer 2. Value "-" |
Regarding point 1 * Generally, three users erp, demo and leer will be created in /etc/passwd
* ssh keys will be recorded in Regarding point 2 * No user will not be created with the value "-". |
Batch user names |
ABAS_CLIENT_USERNAMES_BATCH |
1. Value "-" 2. berp bdemo bleer |
Regarding point 1 * If you preset the variable with the value "-", no batch user is created for security reasons. Regarding point 2 * If required, you can specify the three users berp, bdemo and bleer, which will then be created automatically in /etc/passwd |
DMS user |
DMS_USERNAME |
1. dms 2. Value "-" |
Regarding point 1 * The preset value for the user of the document management system is dms
* The user is required to install Abas DMS.
* The user "dms" will be created in /etc/passwd
* The ssh key will be recorded in: Regarding point 2 * The user will not be created with the value "-". |
DMS group name |
DMS_GROUP_NAME |
dms |
* Is the group name of the DMS user |
DMS group number |
DMS_GROUP_NUMBER |
<computed> |
* Group number of the DMS group |
DMS path |
DMS_BASEPATH_PATH |
/mnt1/abas/s3 |
* The exchange directory for the Abas DMS archiving is created under /mnt1/abas/s3. |
DMS basename |
DMS_BASEPATH_NAME |
abasdms |
* The preset value for the exchange directory is "abasdms". * Unlike the Home directory of the user "dms", "abasdms" is used to store abas-specific data, for example, index files, PDF documents, etc., which will be transferred to the DMS. |
DMSPATH= /mnt1/abas/s3/abasdms |
|
* This is only a notification parameter that displays the exchange directory for Abas DMS. * The directory is composed of the above values of DMS path and DMS base name. * This directory will later be released with special permissions per SAMBA. |
Full text user |
VTS_USERNAME |
|
1. vts 2. Value "-" |
Regarding point 1 * The preset value is "vts"
* This user is required for the full text search installation and will be created automatically The full text search itself is not installed per default
* The user "vts" will be created in /etc/passwd
* The ssh key will be recorded in: * The user will not be created with the value "-". |
Help port |
HELP_PORT |
12580 |
* The default value is 12580. * The port is valid for one installation. * An additional individual port is required per installation |
abas group name |
ABAS_GROUP_ NAME |
abas |
* The preset value is "abas". * Group will be created in /etc/group |
abas group number |
ABAS_GROUP_ NUMBER |
<computed> |
* The next free group ID will be used automatically. * Value will be assigned to the group "abas" in /etc/group * You can assign your own custom gorup ID |
Archname |
ABAS_ARCHNAME |
x86_64_linux |
* Identifies the architecture of the operating system * Cannot be changed! |
Javapath |
ABAS_JAVAPATH |
must be set individually, e.g., /mnt1/java8 |
* Value is not preset * Value remains empty if you do not pass the parameter upon calling the script * The Abas installation will not work without specifying Javapath! * Specify the path under which Java was installed or should be installed. * The path will be automatically written in all necessary files by the script. If you do not specify a path, you will need to do this manually afterward (not recommended)! |
Docker root dir |
|
* Checks where Docker was installed * Docker root directory must be moved from /var/lib/docker to a data partition, as there is not enough space under /var/lib/ (a guide for this is provided here "Docker" "Changing the Docker root directory" section) . * Installation cancels if Docker root is under /var/lib/docker |
datmod port |
ABAS_PORT_ DATMOD |
|
48392 |
* The port can be changed. |
Service file for port 48392: /etc/xinetd.d/datmod |
|
edp port |
ABAS_PORT_EDP |
||
6550 |
* The port can be changed. |
Service file for port 6550: /etc/xinetd.d/edp |
Legend of the erpOSPrepare.sh output
-
For user: * indicates that the user exists and ssh login is possible
-
For user: ! indicates that the user exists but ssh login failed
-
For user: X indicates that the user-home is not part of abas-base (/mnt1/abas) but ssh login is possible
-
For user: Y indicates that the user-home is not part of abas-base (/mnt1/abas) and ssh login failed
-
For directory: * indicates that the directory exists
-
For directory: # indicates that the directory exists and is a client directory (Allowed in upgrade only)
-
O marked lines: Some groupnames or groupnumbers already exist. See O marked lines! This is an optional function. It is not necessary to change these values. However, it can be a security risk if you want to separate the installations.
-
R means: a RabbitMQ container with the value displayed in the line already exists.
RabbitMQ and IceDaemon will not be installed! If you require multiple installations with RabbitMQ, you must change the value of RABBITMQ_CONTAINER_PREFIX when calling erpOSPrepare.sh.
Example:
Call RABBITMQ_CONTAINER_PREFIX=abastest
generates abastest_abasrabbitmq_1 as the container name
rabbitmq container RABBITMQ_CONTAINER_PREFIX abastest
rabbitmq systemfile RABBITMQ_SERVICEFILE_NAME abas-rabbitmq
docker container name: abastest_abasrabbitmq_1
10.7. Additional scripts for user and SSH installations
The complete installation requirements can be created using the erpOSPrepare.sh script. In order to, for example, easily create missing users or missing ssh keys during the upgrade, the script uses the two administration scripts "erpUserPrepare.sh" and "erpSSHPrepare.sh". These scripts can also be used individually to specifically create new users.
Create a user for Abas: erpUserPrepare.sh
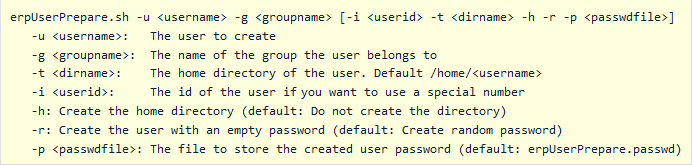
Example: Create new user
.In das Verzeichnis der Installations-CD oder ins HOMEDIR wechseln.
# Als root-Benutzer einloggen

cd /mnt1/tools/abas/CDftp-2200r8n02/
# Alternativ
cd $HOMEDIR
Create the user "rabbitmq".
.Hier im Beispiel ist der Name der zugehörigen Gruppe "abas". Das muss eventuell geändert werden.
$ ./bin/erpUserPrepare.sh -u rabbitmq -g abas

Create the ssh keys required for Abas: erpSSHPrepare.sh

Example: ssh keys for new user
# Als root-Benutzer einloggen
cd /mnt1/tools/abas/CDftp-2200r8n02/

# Alternativ:
cd $HOMEDIR
Create ssh key for user "rabbitmq".
.Hier im Beispiel ist der zugehörige Benutzer "s3" und die zugehörige Gruppe "abas". Das muss eventuell geändert werden.
/bin/erpSSHPrepare.sh -u rabbitmq -s s3 -g abas
